OVC Online Training Course
Module 4 – Tips, Tricks and FAQ’s
Below is a selection of short videos with useful tips and tricks to make your procedures easier and more predictable.
OVC Contact Instrument Tip
In this video we show the use of the OVC Contact Instrument to help you build contact points.
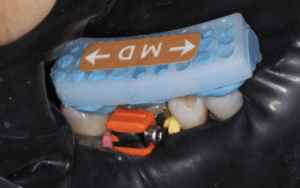
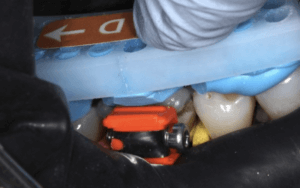
Tip for securing the McDonald Matrix Band during band placement
Sometimes it can be difficult to place and tighten the McDonald Matrix band in the mouth – so this video details a tip to secure the Matrix Band with a wedge before tightening.
Spot Cure Half of OVC + Dipping Resin Tip for faster clean up – Dr Terry Wong
In this tip Dr Terry Wong shows his method of removing the band, curing only the lingual side of the OVC, then smoothing the buccal side with dipping resin and Optra sculpt pads.
Clinical Guidelines & Technical FAQ’s
A good case for the OVC includes any structurally compromised posterior tooth, in need of full occlusal coverage. Generally, any case where the McDonald Matrix Band can be retained in a stable position is suitable.
Below are resources that will help you decide if a case is suitable for the One Visit Crown (OVC):
See a PDF with examples of OVC clinical indications showing ideal OVC case examples.
To stabilise the McDonald Matrix Band during placement, you may wish to use the wooden wedge technique.
Sometimes additional matrix stabilisation can be achieved by elevating the margins using the OVC Wedges that are in the kit.
Note: If you have a plunging opposing cusp, you will need to re-contour it first.
For visual examples on prepping teeth for OVC procedures – click here for a PDF showing clinical case prep examples.
The key to prepping teeth for the OVC is to achieve enough occlusal reduction. Use the Occlusal Reduction Guide to check for adequate occlusal reduction.
Prepare the tooth with a round diamond bur of at least 1.2 mm diameter, followed by yellow strip tapered round-end diamond bur to remove sharp edges and polish the prep. Bevel the margins for better bonding, shade blending and easier matrix application.
Have questions about the removal of sound cusps and preserving tooth structure? Here is an article on compression dome theory that explains why this might produce a stronger overall restoration.
It is important to check the occlusal clearance before starting the OVC customisation. Allow at least 1 mm of clearance in the central fossa and 1.5 mm at the cusps and marginal ridges. OVC Occlusal Reduction Guides (which are the same thickness as the hard occlusal layer of the OVC) are supplied to confirm the minimum required clearance is achieved.
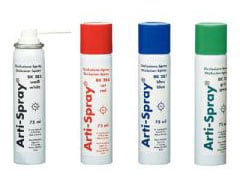
The Occlusal Reduction Guide can be covered on both sides with a coloured occlusal indicator spray such as Bausch Arti-Spray® to aid high spot identification. Place the sprayed Occlusal Reduction Guide over the dried prep and get the patient to gently bite. This will leave a coloured mark on the high spots that need further trimming.
Correct vertical height and positioning can be achieved through the use of the Occlusal Seating Guide, which is custom-made by our lab technician based on your patient’s tooth impression.

The best way to speed up the overall OVC procedure is to shape and carve the uncured composite rather than trimming cured composite.
In particular, it is especially worth spending a few extra moments to carve the proximal marginal ridges before curing as these are difficult to get right after the composite has cured.
To do this, we recommend the following:
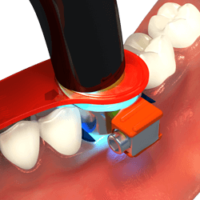
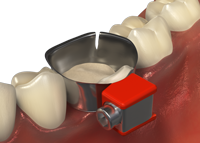
After you are satisfied with the seating and occlusal position of the OVC, spot cure to stabilise the OVC, leaving the periphery uncured. To spot cure, use the spot curing tool.


After spot curing, the occlusal dimension will be fixed but the excess uncured material will extrude from the band.
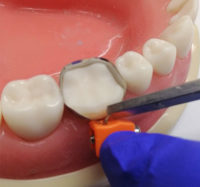
 We recommend clearing away as much of this excess uncured material as possible with a fine instrument such as the IPC Off Angle Short Composite Instrument from Cosmedent. You can also buy a shaping instrument from Rhondium.

After removing the excess material, you can carve the marginal ridges then light cure while masking the buccal side with the edge of the SpotCure instrument. This leaves the buccal composite uncured so that you can shape it. Undo the band or cut off the orange toggle to gain access to the buccal surface.
You may prefer to use Dr Terry Wong’s method, using a smoothing pad to smooth margins and reduce finishing time prior to curing.
Before polishing and finishing, please remember to fully cure the OVC from all sides.
During the final cure, be aware of the heat emitted by your curing light and cool the tooth with air/water spray if the tooth is getting hot.
Use your preferred burs, disks and polishers and then, if desired, a soft brush with polishing paste such as Cosmedent Enamelize for high shine.

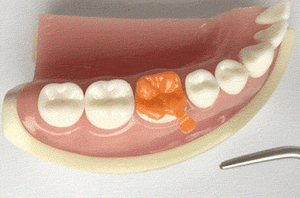
Small localized dark areas on the prep, such as an amalgam tattoo or dark dentine spots, can shine through the restoration due to the high translucency of the material. To prevent this from happening, it is advisable to bond a white opaque flowable liner over the dark areas before OVC adaptation.
Remember that when you apply a bonding agent to the tooth prep and air dry, it tends to splatter and coat the inside of the matrix band. It then bonds to the OVC and the band is virtually impossible to remove unless you DEBOND the band first. Debond the band by sliding a fine instrument interproximally between the band and the OVC. Approach from the buccal side. As you keep pressing the band will pop free from the lingual side of the OVC. Often you need to prise the band away both mesially and distally before it will “pop”. Once popped, it can be pulled with tweezers from the lingual side.
If the contact is nice and tight the band needs to be wiggled out. Note that “over-tight” contacts resolve themselves within 24 hours by the neighbouring teeth moving (orthodontically). Remember that we are talking about 20-50 microns of movement. We recommend that you tell the patient that you have done a really good job getting the contacts tight and ask them to floss it the following day and make an appointment if it can’t be flossed.
Inter-proximal stripping of a very tight contact with a diamond strip is difficult, probably unnecessary (see above) and you can overdo it, leaving an open contact point. It is better to leave it and deal with it if the patient still has a problem a week later. (In Dr Simon McDonald’s experience, he has never had a patient complain of an over tight contact, a day or so later).
Check for occlusal contacts interference in both central occlusion and lateral excursions. It is important to check for lateral excursion contacts and remove them to preserve the integrity of the restoration and for patient comfort.
The aesthetic appeal of the OVC can be enhanced by staining with coloured resins following the manufacturer’s instructions.
Technical FAQs
Techniques to consistently get good proximal contacts.
The new OVC Wedge technique is a revolutionary way to get tight contacts every time.
If you prefer to use the McDonald Matrix Band technique, the principles to achieve good contacts are similar to Class II/MOD composite restorations. Here are some useful tips;
- The 30-micron thickness of the matrix band must be compensated for by tooth separation using any of the following techniques (or in combination):
- Simple wooden wedging. The standard technique is to push firmly on the wedge, wait for the periodontal membrane to relax and the teeth to move apart and then push firmly on the wedge again. This should be repeated. Selection of the right sized wedge is critical. Sometimes it is necessary to start with a smaller wedge and then switch to a larger wedge.
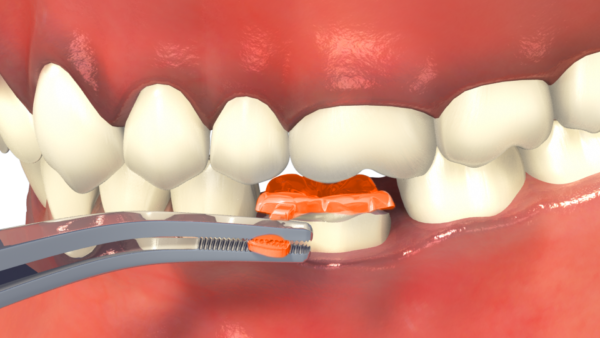
Note: Deep proximal boxes need elevating using the OVC Wedges beforehand, otherwise the wooden wedge can dent the matrix band. View technique here. - Wooden wedging PLUS firm pressure on the contact area using a contact forming instrument such as the OVC Contact Instrument or the Contact Pro 2 instrument.
- A Garrison Composi-tight original long-tine separating ring and wooden or plastic wedges. This type of ring does not collapse into the matrix band if the tines are placed on the other side of the wedge. The technique is shown here.
- Do only one contact at a time.
- Simple wooden wedging. The standard technique is to push firmly on the wedge, wait for the periodontal membrane to relax and the teeth to move apart and then push firmly on the wedge again. This should be repeated. Selection of the right sized wedge is critical. Sometimes it is necessary to start with a smaller wedge and then switch to a larger wedge.
- The matrix band must be in intimate contact with the neighbouring tooth. Burnishing helps contour the band to the correct shape and stretches the foil so that it is closer to the neighbouring tooth. A ball-burnisher works best for this, although you can also use the OVC Contact Instrument.
If an open contact is unintentionally created, it is because the band was not near the neighbouring tooth. Matrix bands often pull away from the neighbouring tooth and it is impossible to see if this has happened. Therefore, the matrix band must be held or tacked into the correct position using either flowable composite resin or regular composite. The OVC Contact Instrument is perfect for this. - The OVC McDonald Matrix Bands are formed and sized for each OVC. Sometimes they need a little extra flare around the top so that they can touch both mesial and distal contacts. This can also be an issue when you are trying to close a larger inter-proximal gap.
- Techniques to help in this situation are:
- Cutting one of the top “straps” that go into the orange toggle releases the tension around the top half of the band. The lower strap is the one that tightens around the neck of the tooth and must be retained.

- Cutting a dart in the lingual side of the band as shown below:

- Loosening the band slightly can help, but it may have the downside of creating a slight ledge, so this is not a favoured option by some clinicians.
- Cutting one of the top “straps” that go into the orange toggle releases the tension around the top half of the band. The lower strap is the one that tightens around the neck of the tooth and must be retained.
- If you do unintentionally create an open contact, here are guidelines on how to quickly fix the problem.

In most cases, deep cavity defects are cured in layers using standard procedures before the OVC is placed. Contraction issues are small since the C-factor is only 1. These are even further reduced by spot-curing the centre of the OVC first. By spot-curing the centre, any shrinkage can draw additional material from the surrounding uncured composite, while pulling the crown towards the tooth. This reduces internal stresses. The final cure should only be curing the periphery of the OVC and not the centre.
Spot-curing the core of the uncured composite stabilises the crown in the vertical dimension, allowing you to trim the uncured composite from the peripheral surfaces easier. This reduces the finishing time.
You only need to cure long enough to stabilise the OVC and the time will depend on the power of your curing light. Too much curing will make it hard to trim the periphery of the OVC.
The most important point is to do most of the shaping before light-curing. Once it is set, the process is identical to finishing any other composite restoration.
It’s a very simple process – follow these easy steps:
- Remove excess composite with diamond or carbide burs of medium grit.
- Use fine grit to smooth off the surface.
- Use appropriate polishing discs.
- Use a soft brush with polishing paste.
Yes, absolutely. You can place the Occlusal Reduction Guide inside the Seating Guide to ensure that you have sufficient occlusal clearance.